Create a Mass Balance Analysis Initialization Case
The analysis rule may require an initialization Case to exist if inventory (tank) elements are in the model. This is due to tank elements having a delta inventory calculation that uses the calculated mass from the previous case. Also the General Gross Error Analysis, which can be called by this analysis, performs checks on several properties that compare the previous Case with the Case being calculated.
Note: If there are no inventory elements in a case, the Mass Balance analysis can be run without a previous Case selection.
Before creating cases, check the [Analysis Rules and Time Rules](/DocumentDepot/DocSFHub/docs_2026/docs-sf-system/ANALYSIS-RULES/Analysis%20Rules%20and%20Time%20Rules/choose-an-analysis-rule) topics, and configure a time rule for this Model Analysis.
To configure the Analysis Rule case, follow the steps below using either the System Explorer or the Modeler:
Follow the steps under either System Explorer or Modeler.
In the Model Analyses navigation pane, select the Model analysis for which you are creating a case.
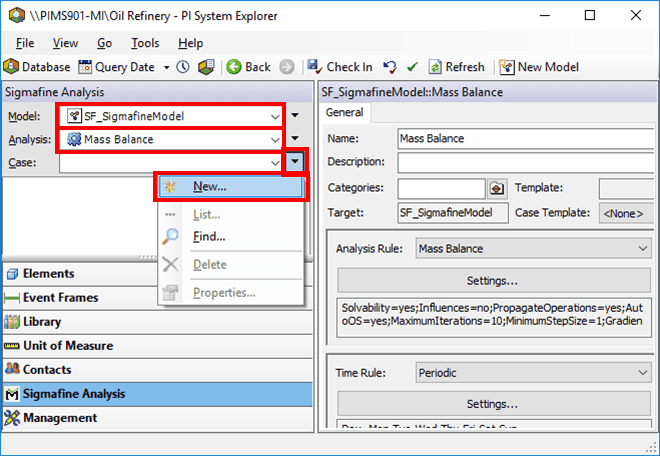
Click the Case
 menu button and select New.
In the display with the Model for which you configured an analysis:
- On the SF Analysis Toolbar, click the New Case button.

Use either System Explorer or Modeler to change the times for the Case to match a Case for the source analysis.
This manual change of times is necessary to start the Case series.
For detailed instructions on changing the times, \see the topic under Server & Client.
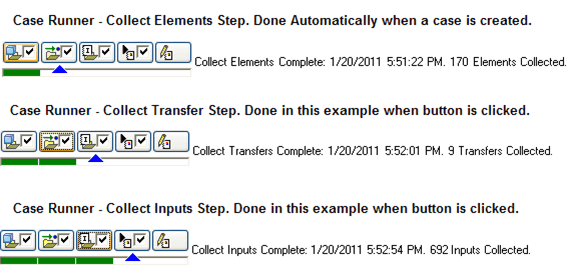
Use the Case Runner to run the Collect Elements, Collect Transfers and Collect Inputs steps, as shown in the following image.
If the analysis contains no inventory elements that are set to use the value from the previous Case as the opening inventory, you can continue running the Case through completion (using the Run and Publish steps). Otherwise, the first full Case that will be run and then published will be the next case.
Check-in the Case or continue on to create subsequent cases.
After the first case, Sigmafine uses the established Time Rule to automatically assign start and end times to the subsequent cases.
To create more cases, follow the same procedure as described above to create the first case. If you examine the Case properties of this new case, note the previous Case as the initial Case described earlier.
Use Case Runner to run all analysis steps (or choose to run each step separately) and view the log and results tabs to see the results from each step of the analysis.
Click the buttons in the Case Runner to execute the analysis.
- If Case Runner is not visible, on the View menu, click Case Runner.
- If the checkboxes are not visible, right-click on Case Runner and select Configure to customize the buttons.
- To view the log and results tabs to see the results from each step of the analysis:
- On the Log (orLog Output) tab, view any errors or messages from the Analysis and if enabled, from the Gross Error Analysis checks.
- b. On the Results tab, examine the results of the Analysis.
More information about running an analysis and viewing results is provided under Component Mass Balance Analysis Rule.